This documentation provides a guideline for integrating BuzzAd Benefit into an Android application. With its native format and high performance rewarded ads feature, BuzzAd Benefit can maximize publisher revenue without impairing the user experience.
Index
| Table of Contents |
|---|
Getting Started
The below items are necessary to proceed with the integration:
Request
app_idto Buzzvil's BD managerRequest
unit_idfor the desired Type to Buzzvil’s BD managerType A - Native Ads:
NATIVE AD UNIT_IDType B - Feed:
FEED UNIT_IDType C - Interstitial:
INTERSTITIAL UNIT_IDIf Benefit SDK is already integrated,
POP UNIT_IDIf you integrate Pop only and use Benefit SDK for the first time, go to BuzzAdPop
Provide your
postback urlto Buzzvil's BD managerPostback API document (link)
Requirement
Implement AndroidX to the project by following the guide.
Check More details section to use action type ads
Installation
Adding the dependencies in build.gradle
| Code Block |
|---|
repositories {
    maven { url "https://dl.bintraybuzzvil.com/buzzvilpublic/maven/" }
}

...

dependencies {
    implementation ("com.buzzvil:buzzad-benefit:2.15.+") {

        //  Add the following line if Pop is not being used
        exclude group: 'com.buzzvil', module: 'buzzad-benefit-pop'
        // Add the following line if Notification is not being used
        exclude group: 'com.buzzvil', module: 'buzzad-benefit-notification'
    }
}
|
Outbrain ADN SDK Integration
Outbrain is an SDK-type ADN for publishers who want non-rewarded ad volume.
If you want to integrate Outbrain, add the following code to the dependencies section of
build.gradle, and please be sure to inform the BD Manager to set up the ads.
| Note |
|---|
Requirements:
|
| Code Block |
|---|
// Outbrain
implementation("com.buzzvil.mediation:sdk-outbrain:3.9.2.1")
|
| Info |
|---|
|
| Info |
|---|
The image library has been changed from UIL to Picasso from BuzzAdBenefit 2.9.0. |
| Warning |
|---|
(FAQ) When errors occur during build (Click the below) |
| Expand | ||||||||||
|---|---|---|---|---|---|---|---|---|---|---|
| ||||||||||
If BuzzScreen is being used together and it can be resolved with BuzzScreen 3.11.+
The error occurs in case theme is not set in BuzzAdBrowserActivity (To be modified)
|
SDK Initialization
Step 1: Initializing the BuzzAdBenefit
Add the following meta_data to AndroidManifest.xml
Insert
app_idin place of "000000000000"
| Code Block | ||
|---|---|---|
| ||
<?xml version="1.0" encoding="utf-8"?>
<manifest xmlns:android="http://schemas.android.com/apk/res/android"
          package="com.buzzvil.packagename">
    <application>
        ...
        <!-- Caution: Replace `000000000000` with Your AppKey  -->
        <meta-data
          android:name="com.buzzvil.APP_KEY"
          android:value="app-pub-000000000000" />
    </application>

</manifest> |
Please add the initialization code for the BuzzAdBenefit in the onCreate() of the application class.
| Code Block | ||
|---|---|---|
| ||
public class App extends Application {
    @Override
    public void onCreate() {
        BuzzAdBenefit.init(this, new BuzzAdBenefitConfig.Builder(this).build());
    }
} |
Step 2: Setting the UserProfile
Please set the UserProfile at the user login.
Note : User ID and targeting information (gender, birth year) is necessary for the proper functioning of BuzzAd Benefit. Ads are served only after the
setUserProfilemethod is called.
userId : A unique identifier assigned to each user
Please consult with the BD manager if there is a possibility of
userIdchanging.e.g.:
userIdchanges when a user reinstalls the app after deletion
gender
UserProfile.Gender.MALEUserProfile.Gender.FEMALE
birthYear
| Code Block | ||
|---|---|---|
| ||
final UserProfile.Builder builder = new UserProfile.Builder(BuzzAdBenefit.getUserProfile());
final UserProfile userProfile = builder
        .userId("Your_Service_User_ID")
        .gender(UserProfile.Gender.MALE)
        .birthYear(1985)
        .build();

BuzzAdBenefit.setUserProfile(userProfile); |
Note : Once session key registration is complete via Step 1 and 2,
SessionReadybroadcast is sent. Without the session key, an API key needed to receive advertisement from the server, the SDK cannot load any ads. Therefore, if the time interval between Step 2 and the ad request is too short, the below procedure is required for session key registration.
| Code Block | ||
|---|---|---|
| ||
// 1. create a BroadcastReceiver
private BroadcastReceiver sessionReadyReceiver = new BroadcastReceiver() {
    @Override
    public void onReceive(Context context, Intent intent) {
        // Session is ready
    }
};

// 2. register the receiver to LocalBroadcastManager
private void registerSessionReadyReceiver() {
    LocalBroadcastManager.getInstance(context).registerReceiver(sessionReadyReceiver, BuzzAdBenefit.getSessionReadyIntentFilter());
}

// 3. unregister the receiver when you're done
private void unregisterSessionReadyReceiver() {
    LocalBroadcastManager.getInstance(context).unregisterReceiver(sessionReadyReceiver);
} |
Step 3: Setting the UserPreference
Please set the UserPreference at the user login.
autoplayType(AutoplayType autoplayType): Configures video autoplay mode.AutoplayType.ENABLED: Video autoplay is enabledAutoplayType.ON_WIFI: Video autoplay is enabled only on WiFiAutoplayType.DISABLED: Video autoplay is disabled
| Code Block | ||
|---|---|---|
| ||
final UserPreferences userPreferences = new UserPreferences.Builder(BuzzAdBenefit.getUserPreferences())
        .autoplayType(AutoplayType.ON_WIFI)
        .build();
BuzzAdBenefit.setUserPreferences(userPreferences); |
Step 4. Removing the user settings
Please remove the UserProfile and the UserPreferences upon user logout.
| Code Block | ||
|---|---|---|
| ||
BuzzAdBenefit.setUserProfile(null); BuzzAdBenefit.setUserPreferences(null); |
Step 5. Proceeding to the next step
Please refer to the following link to finish the integration.
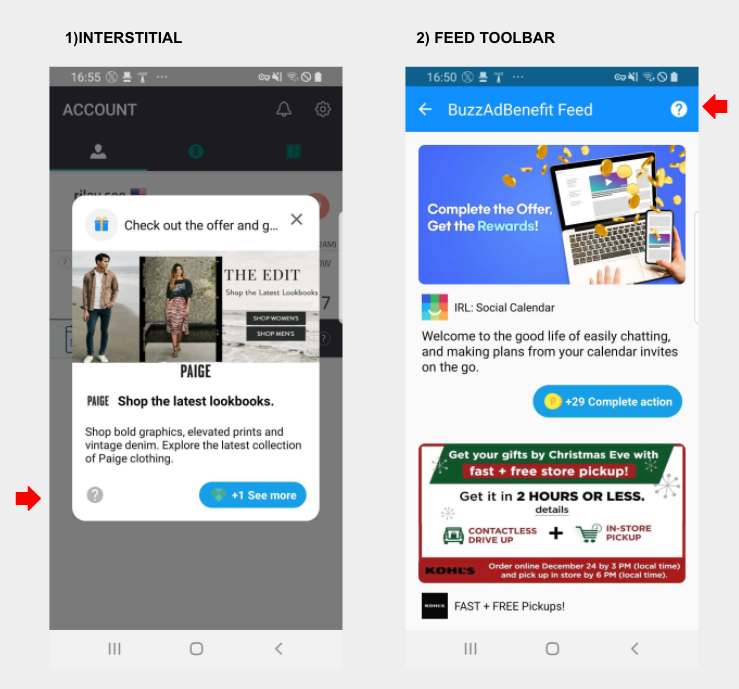
Type A - Native Ads: For exposing native ads that seamlessly blend with the in-app design
Type B - Feed: For exposing list of ads on a feed
Type C - Interstitial: For exposing interstitial ads using Buzzvil’s predefined layout
Type D - Pop: For exposing list of ads through floating chat head on the home screen outside of the app and top of other apps
More details
(Important) Privacy Statement
In order to comply with the privacy laws and Google policies, user consent is necessary for the collection and use of personal information. The privacy policy can be shown to the user without building a separate UI. Ad participation for users can occur only after the privacy policy consent has been received.
The consent to collect personal information is shown in the form of a bottom-sheet and can be called through API.
<Privacy policy consent>
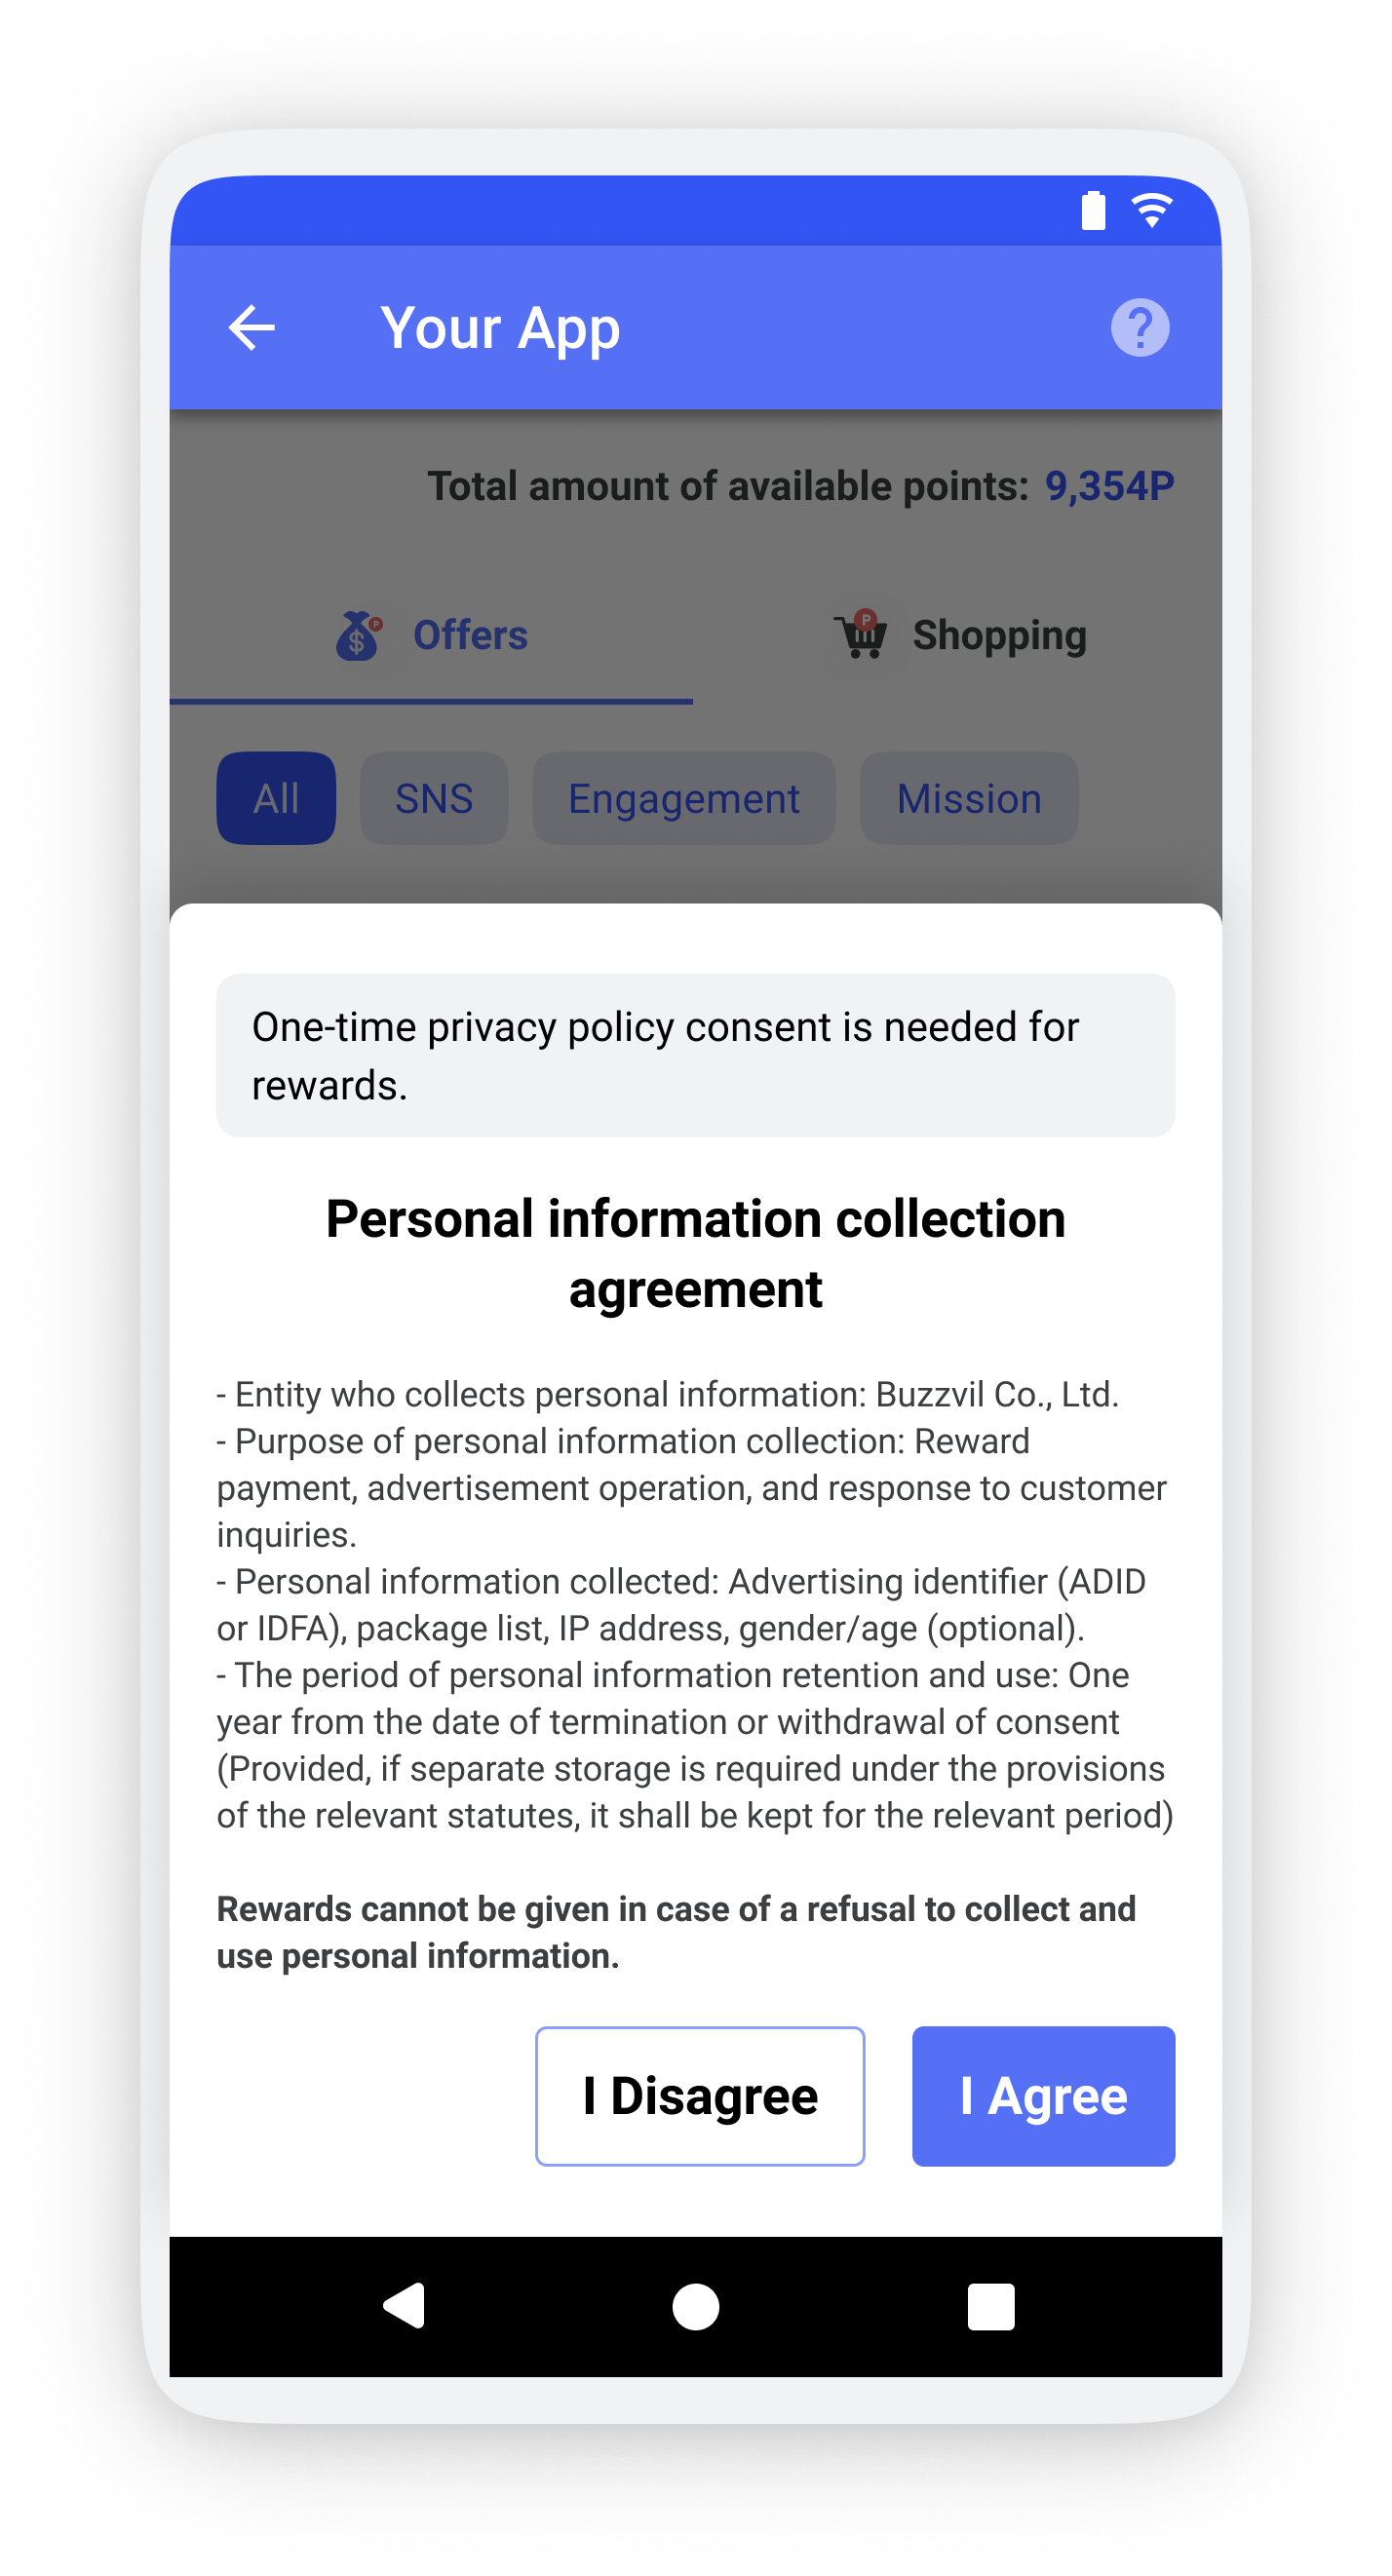
<Without privacy policy consent>
The following APIs can be used in relation to the privacy policy.
| Code Block | ||
|---|---|---|
| ||
// API that shows the privacy policy UI BuzzAdBenefit.getPrivacyPolicyManager().showContentUI(context, listener); // Indicate 'I agree' to the privacy policy BuzzAdBenefit.getPrivacyPolicyManager().grantConsent(); // Indicate 'I do not consent' with the privacy policy BuzzAdBenefit.getPrivacyPolicyManager().revokeConsent(); // Check for privacy policy consent BuzzAdBenefit.getPrivacyPolicyManager().isConsentGranted(); |
(Important) If the above API is not used, the publisher must directly implement a UI that obtains consent to Buzzvil's privacy policy in the following situations:
When entering the feed without consent
When clicking the Pop icon without consent
When getting user’s consent to expose Buzzvil products
| Note | |||||
|---|---|---|---|---|---|
Note
|
(Important) Conditions to allocate action-type ads
[1] Change of the CTA button → If you integrate SDK 2.2.3+ and do not customize CTA button, it is automatically applied.
If you have integrated to the lower version and used the CTA button as a custom class, it is required to make the CTA button look normal in every situation referring to the changes below. (CTA button implementation is addressed in the ads placement type)
(Before) In case of action-type ads, CTA could not be displayed as 'Accumulation completed' due to the time difference between point accumulation and ad click. and it was displayed as 'Verifying participation when the click was confirmed
(After) ‘Accumulation completed’ call-back is applied to action-type ads as well as display ads. It should be divided into 3 stages. Before participation → Verifying participation(is clicked) → Participation completed(is participated)
[2] Use of VOC(Inquiry Page) about action-type ads
BuzzAd Benefit SDK provides ads that reward various user actions such as videos, app installations, and Facebook page likes. And, in the case of such ads, users often send VOCs for unreceived rewards.
BuzzAd SDK provides a web page to automate the reception and processing of the users' VOCs.
It is unnecessary to implement it by each unit and does not force the location of the VOC because this inquiry page is viewed based on the integrated app.
Proceed the below steps to use this function
Design user entry Icon/Tab for VOC page loading.
BuzzAdBenefit.getInstance().showInquiryPage(context)is called when the Icon/Tab is clickedIf you want to show the inquiry page only for a specific unit, use
showInquiryPage(Context context, @Nullable final String unitId). Enter the Unit Id that you want to show the inquiry page. If the Unit id is null, the inquiry page is viewed based on the app.
For Interstitial and Feed type, you can use the default icon provided by Buzzvil for the inquiry page. (Click the below)
| Expand | ||
|---|---|---|
| ||
[3] When using the Custom Launcher, implement the usage of the Custom In-App Browser at the bottom
If you are not currently using the Custom Launcher, you only need to meet the two conditions above.
If you plan to use Custome Launcher, or if you are already using it in 1.X version, the following items must be applied.
How to use Custom In-App Browser
You can customize the In-App Browser that is used when running ads. For example, loading ads landing page can be implemented in a class designated by the publisher.
Note for implementation
In-App Browser must be implemented using Fragment provided by BuzzAdBrowser. Otherwise, some ads (action ads, countdown reward ads) may not work properly.
The URL of LandingInfo provided by Launcher should not be arbitrarily changed. In this case, the web page may not load properly.
[1] Implement CustomBrowserActivity
| Code Block |
|---|
public class CustomBrowserActivity extends AppCompatActivity {
    public static final String KEY_URL = "com.sample.KEY_URL";
    private BuzzAdWebView webView;

    @Override
    protected void onCreate(@Nullable Bundle savedInstanceState) {
        super.onCreate(savedInstanceState);
        setContentView(R.layout.activity_custom_browser);

        // Get Fragment that has WebView using URL as KEY
        Intent intent = getIntent();
        BuzzAdBrowserFragment fragment = BuzzAdBrowser.getInstance(this).getFragment(intent.getStringExtra(KEY_URL));
        getSupportFragmentManager().beginTransaction().replace(R.id.browserContainer, fragment).commit();
        this.webView = fragment.getWebView();

        // You can receive events from Browser. When DeepLink is open, you need to close the browser to prevent blank pages from appearing.
        BuzzAdBrowser.getInstance(this).setOnBrowserEventListener(new BuzzAdBrowser.OnBrowserEventListener() {

        // Replace the existing isDeepLink with below
            @Override
            public void onDeepLinkOpened() {
                finish();
            }
        });
    }

    // Optional - goign back when pressing BackButton
    @Override
    public void onBackPressed() {
        if (webView.canGoBack()) {
            webView.goBack();
        } else {
            super.onBackPressed();
        }
    }
}
|
[2] activity_custom_browser.xml
| Code Block |
|---|
?xml version="1.0" encoding="utf-8"?>
<FrameLayout xmlns:android="http://schemas.android.com/apk/res/android"
    android:layout_width="match_parent"
    android:layout_height="match_parent">
    <FrameLayout
        android:id="@+id/browserContainer"
        android:layout_width="match_parent"
        android:layout_height="match_parent" />
</FrameLayout>
|
[3] Implement Launcher
| Code Block |
|---|
public class MyLauncher implements Launcher {

    @Override
    public void launch(@NonNull Context context, @NonNull LaunchInfo launchInfo) {
        launch(context, launchInfo, null);
    }

    @Override
    public void launch(@NonNull final Context context, @NonNull final LaunchInfo launchInfo, @Nullable final LauncherEventListener listener) {
        launch(context, launchInfo, listener, null);
    }

    @Override
    public void launch(@NonNull final Context context, @NonNull final LaunchInfo launchInfo, @Nullable final LauncherEventListener listener, @Nullable List<Class<? extends BuzzAdJavascriptInterface>> javascriptInterfaces) {

        // running Custom Browser
        final Intent intent = new Intent(context, CustomBrowserActivity.class);
        intent.setFlags(Intent.FLAG_ACTIVITY_NEW_TASK);
        intent.putString(CustomBrowserActivity.KEY_URL, launchInfo.getUri().toString()); // URI는 변경 하면 안 됨
        context.startActivity(intent);
    }
}
|
[4] Setting Launcher created after calling BuzzAdBenefit.init
| Code Block |
|---|
BuzzAdBenefit.setLauncher(new MyLauncher()); |
[+] How to use sourceUrl of Article when using Custom launcher
| Code Block |
|---|
public class MyLauncher implements Launcher {
    @Override
    public void launch(@NonNull final Context context, @NonNull final LaunchInfo launchInfo, @Nullable final LauncherEventListener listener, @Nullable List<Class<? extends BuzzAdJavascriptInterface>> javascriptInterfaces) {
        if (launchInfo.getArticle() != null) {
            String sourceUrl = launchInfo.getArticle().getSourceUrl();
        }
    }
}
|
In case of content, if you want to handle the landing method in a different way according to the URL scheme (ex. content that moves to another screen without opening a browser in the app), you can get the sourceUrl of the NativeArticle object and perform branch processing in the following way.
[+] If you want to determine in advance whether it is ad or content when using a custom launcher
| Code Block |
|---|
public class MyLauncher implements Launcher {
    ...
    @Override
    public void launch(@NonNull final Context context, @NonNull final LaunchInfo launchInfo, @Nullable final LauncherEventListener listener, @Nullable List<Class<? extends BuzzAdJavascriptInterface>> javascriptInterfaces) {

        // you can determine whether it is ads or content using the following
        if (launchInfo.getAd() != null) {
            // ads
        } else if (launchInfo.getArticle() != null) {
            // content
        }

        ...// running Custom Browser
    }
}
|
Applying theme to BuzzAd Benefit Products
You can easily customize the BuzzAd Benefit UI if you define the attribute provided by Buzzvil in AppTheme.
attribute (type) | child attribute (type) | customizable UI |
|---|---|---|
| N/A |
|
|
|
|
| Expand | ||||
|---|---|---|---|---|
| ||||
example 1. Apply
example 2. Apply
|